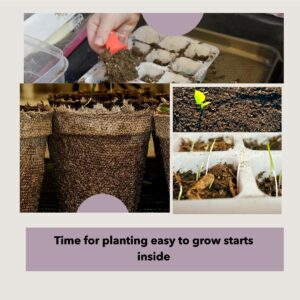
Have you been wanting to see the spring? It is coming but it may take a little bit of time, which means it is a great time for planting easy-to-grow seedlings inside. I, for one, have never planted seeds to grow inside the house before. That is what Twilight Kaleidoscope is all about trying new things, learning, and growing. Growing easy-to-grow seedlings is always more enjoyable with younger kids exploring nature and the art of seeds growing into little plants. Okay, it is just as fun for me.
Simple supplies for growing starts inside

First of all, you need the obvious, seeds and dirt. I picked out seeds from Amazon from Outsidepride, they have a lot of seeds from perennials to annuals. The difference between the two is easy to remember if you think annuals must be planted annually. Makes sense. Using the USDA Zoning Charts to choose your seeds is helpful.
I looked at a few starter sets and decided to go simple with these cute trays. Look at these trays, they look like they have little faces. You can’t help but smile at this alone. I purchased 2 because I didn’t know if I would like them and I may want to try others. They are better than I thought they would be with thick plastic on the top and the silicone on the bottom is sturdy. As you will see they did a great job. I may want to try the ones with a cover next time just to see if there is any difference at all.
Heating pad for faster germination of seedlings
I didn’t know if this would work or not but it couldn’t hurt because it is cold here in the winter and I like to be warm why wouldn’t the seeds? The heating map comes all rolled up in a box so it takes a minute to straighten it out. The Seedling Heat Mat is high quality and I was fairly impressed with it. I like that the mat is easy to wipe off. There wasn’t anything negative about it. I wish I would have gotten two at this point.
What is on the Seedling Heat Mat


It has temperatures, approximate days to germinate chart and the basic warnings, etc. This mat also comes with a controller that tells you the temperature of the mat and the temperature you have it set.
Playing in the dirt
Something about playing in the dirt is relaxing and fun for adults as well as kids. The dirt outside is probably better but not available at this time. It will be so fun to plant these outside in the actual good weather. I hope I can update this in the future about how great those plants turn out to be.
I needed some help so I invited a 5-year-old to come help with the planting of the seeds. It was enjoyed by everyone.

Yes, a Play-Doh scoop works just as well as any shovel or spoon. This is very simple and fun as you can see a 5-year-old does a great job and filling the funny faces makes it more fun. An old baking tray tries to catch all of the dirt around and makes for easy cleanup.
After filling a bit with dirt, we then had to plant the seeds. They were very small it said 3 to a container but we might have gotten a few more in there. It was difficult to just get three so we went with fairly close to three.


Potting soil for seedlings
We just used potting soil with some perlite. I am not sure if that was right or not, but I read somewhere that it was great for the wild, tall grass we were planting.
After the seedlings were all planted we added a bit of water and let it sit for a minute before putting it on the heating mat (without the baking tray). It worked great. I had to water them every day with the mat set at 90 degrees. Not a ton of water I didn’t want to drown the seedlings.

The seedlings sprouted
They did it! They sprouted in just 3 days. I was amazed at how quick it was and I just couldn’t believe it. This was a happy day. I was very happy and excited to see these babies breaking through the soil. Almost couldn’t wait to show my little planting partner.
Transplanting the sprouted seeds

I have more to plant so I need to transplant these into some of those brown cardboard cups. After transplanting, I added a tiny bit of fertilizer to the water. Ensuring they had enough nutrients to keep growing. Make sure to not overdo it.
I need these little buggers to be strong for planting outside in the spring for landscaping. If not it will be fake plants from the hobby lobby planted in the yard.
Some didn’t seem to like being moved. I should have waited longer than a week. While the next bunch will be longer than a week before I take them out of their little tray home. They did come out of the tray easily though by pressing gently on the bottom and that silicone just pushed the seedlings up without damaging any of the roots.

Time will tell how they will turn out but for now, I think this is a win for my planting easy-to-grow starts inside. I am inspired and excited for a wonderful green spring.
Discover more from Twilight Kaleidoscope
Subscribe to get the latest posts sent to your email.


