The Mad Hatter is an iconic, fun character and I enjoyed creating such a lovable character. The evolution of this Mad Hatter started with an ordinary styrofoam head that you can find at any craft store.


Let’s do it (the evolution of the Mad Hatter):
This is the 2nd Styrofoam head statue I created with slime (clay) and modeling clay. I have enjoyed this method, mainly because the slime clay dries to be lightweight like paper mache. Some projects just need to be a lot lighter. The first project that I used this type of material on was the leprechaun for St Patty’s Day. That one needed to hang on the wall like wall art, so it needed to be lightweight. This one doesn’t need to hang on a wall. But if you want to put it in a cardboard teacup or a spinning saucer, it always helps.
Slime Clay for the beginning of the character
As stated, Slime Clay is as light as paper when it dies in small quantities. In larger quantities like the Mad Hatter’s nose, while it is still lightweight, does have a weight to it. You may have to add something to counteract the weight depending on your project. It is still surprising how light this whole project is. The only thing I would do again for the nose is add floral wire or long toothpicks coming out from the styrofoam head when the nose is molded. As you can see, the nose did fall a bit when drying overnight. (The nose is squishy like a squishy ball. I didn’t expect that. However, it did add a nice aspect when you touch it.)

One thing about slime clay isn’t that smooth to blend out or at least I haven’t mastered that, but it all works out okay with a thin layer of modeling clay over the top. Modeling clay also does do a nice job of filing in the holes and bumpiness of the styrofoam, as well.
The Hair and Hat for my Mad Hatter
I decided to place the hair on before I finished the face because I wanted to see how the placement would be for it and the hat. I also didn’t want to do more of the face that I needed. Do you like the hair? Amazon has lots of fake fur. This fur/hair was glued on first with dots of hot glue. Followed by clear Elmer’s type glue and left to dry overnight.


As you can probably see I put a pin in the hairpiece first and stuck it in the styrofoam head. I was doing this myself and didn’t want to chance to burn my fingers on the hot glue and I only wanted to place a small dot in certain areas to not melt the head too much. My astonishing evolution is coming together, well, making progress.
Adding the molding clay face to the character
Adding the molding clay face or skin is fairly simple. Roll out the clay as thin as possible and lay it right on top of the slime clay after it has dried. Then paint.

It is not the best picture I have ever taken but I can’t seem to find the rest. I may have deleted it because I had too many pictures. Anyway, the transformation is starting to come together. We have hair, we have skin and we have some color.


The Evolution is nearing completion
I enjoyed the Astonishing evolution of the Classic Mad Hatter is nearly done. I would have instructions about the hat but I didn’t do I great job. It was my first hat and I am afraid I didn’t like it too much. Some of it was the material that I used for this hat. The material was heavy felt sheets with a sticky back which I loved for the ease of use. However, it wasn’t as pliable as I would have liked for this project.


It is in the Details
The marks on his face is where I decided I needed more shadows to bring out his nose and his cheekbones. Not that his cheekbones are dramatic, but they seem bigger at times because of that huge goofy smile.
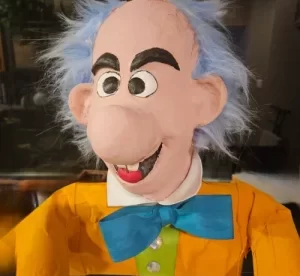
The astonishing Evolution Completed

The Mad Hatter is completed. His outfit was created with a pool noodle, eva foam, sheets of sticky back felt and iridescent button embellishments. The upper chest was made with 2 pieces of pool noodles. Pool noodles are easy to cut and easy to heat. You can heat them to shape or even stick together. Do this in a well ventilated area or outside.
Pool noodles are also easy to pin in place while you work with them. I didn’t glue the pool noodles together (some were heated together) then the sticky back sheets of felt were placed on top. Therefore that glue held everything together.
The bottom is a piece of cardboard that is covered with the sticky back felt as well. That piece is glued to the pool noodles with contact cement glue. The smell is not great but it works.
The shirt underneath is the sticky back felt that was used on the hat. The tie was made with white eva foam (the same that used for the collar) Then it is painted with acrylic paint in teal. Just to add more color to the project without buying more supplies.
The Arms are again pool noodles covered with the sticky back felt. There are no hands because he is going to be in a tea cup and the sleeves will be right up to that cup.
What do you think? This astonishing evolution of the Mad Hatter was done for a Halloween display for a business. There may not be too many times you would have an opportunity to do this type of project, but why not? There are so many ways to be creative and open up that part of your kaleidoscope.
Leave a Reply