Composting with little effort, big results for the beginner aka lazy girl composting. This is what I call my composting style. I do not have a barrel to turn. There is no fancy set up and I am new to it as well. I started thinking about it when I went on a rafting trip with the girls. They had us separate everything not cooked when we cleaned off our plates. Watching them cook they also put all potato peels, ends of any veggies, and other uncooked materials in the compost bucket.
Introduction to composting
I asked what are you going to do with it because we loaded it up every day after breakfast cleanup back on the raft. They said they take it back to their headquarters where someone adds it to the compost piles for landscaping projects, a small garden area, and various other uses. Hmm… I have landscaping projects and I want to plant an herb garden.

It was decided after I got back home and purchased 6 bags of organic compost, that it was time to start doing this myself. The thing is I did not want to put a great deal of money into it or time. Okay, I wanted cheap. On Amazon, I found what I was looking for and checked out some videos of people who had purchased the same thing before I purchased it.

Starting on my composting journey
For the investment, I thought if made it through the winter I would be happy and I would buy a new one in the spring. It has made it through the winter and looks just like it did when I got it. This thing is a study beast.
I started my composting later in the summer, end of July. With a layer of Brown and then a layer of green and alternating those layers. (Grass was not put into mine because I am trying to get some not-great weeds out of the lawn before doing that). The bin when set up is fairly large so I decided to see how much it would hold. It holds a pretty good amount.
Pictures of my lazy girl composting
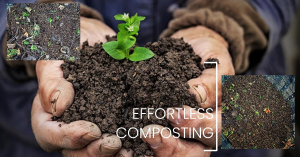
This is my compost after the 2nd turn in the Spring (I turned it once in the fall before the frost hit). If you are wondering what turning is, it is where you get a shovel or a pitchfork and bring the bottom of the pile up to the top. “Turning and mixing your pile from time to time will help speed up the decomposition process and aerate the pile. Use a garden fork to turn the outside of the pile inward. Monitor your pile for moisture, odor, and temperature and make adjustments as needed.” – EPA


This is my compost after the 2nd turn in the Spring (I turned it once in the fall before the frost hit). If you are wondering what turning is, it is where you get a shovel or a pitchfork and bring the bottom of the pile up to the top.
As you can see there are some things still decomposing and I had just thrown some spinach in the pile. I think it is amazing how quickly some of the things broke down. The amount of compost was pretty impressive and it is rich and dark. I am not going to strain it until early June, but I may move the whole bin and give it a full turning. No, it doesn’t smell. I am not that worried about rodents as there are cats around the neighborhood.
Educational
Let’s get to the educational part of composting. First of all, what is composing – it is a controlled oxygenated process that converts organic materials into a nutrient-rich biologically mulch or soil. Microorganisms feed on the materials in the compost pile during the composting process. Water is used for the digestion of the materials and oxygen to breathe. Carbon and nitrogen to grow and reproduce.
What is okay to put in your compost pile
This list varies from composter to composter but this is a good guideline
Okay to compost
- Paper (staples removed) — includes newspapers and non-glossy paper
- Wax-coated paper products
- Cardboard (tape and staples removed)
- Leaves/yard waste (weeds OK for hot piles only — do not include in a cold compost pile to prevent spreading weeds where using compost)
- Sawdust
- Veggie and fruit scraps
- Non-plastic tea bags (staples removed)
- Egg shells (crushed)
- Coffee grounds
- Tissues, paper towels, napkins
- Herbivore manure (e.g., guinea pigs, rabbits, hamsters, cows, etc.)
- Chicken manure — compost in a hot pile only to kill off pathogens and cure (sit unused) once finished for 45 to 60 days to ensure all pathogens have been killed
- Hair (uncolored, unbleached)
- Nail clippings (without polish)
- Urine (great source of nitrogen but err on the side of caution if you take medication)
- Corks
Do not compost
- Plastic or plastic-coated products (e.g., plates, cups, etc.)
- Bioplastics
- Styrofoam
- Oil — except in small amounts (for example, greasy pizza boxes are usually ok if you scrape off food bits)
- Meat, bones
- Dairy
- Cooked foods
Simple process
For me, it hasn’t been too much of a chore. I am delighted to see this process. In the coming months, I will post about how it comes out after the straining and what the actual compost looks like at that point. This compost will go so well with my plants that I have grown from seedlings.
Discover more from Twilight Kaleidoscope
Subscribe to get the latest posts sent to your email.


