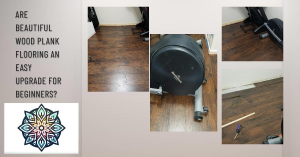
Are beautiful wood plank flooring an easy upgrade for beginners? Perhaps, let’s see what you think. I am a beginner at home improvements. I had very little experience, just simple home repairs. Before I started on my installation, I helped a friend finish up his plank wood flooring to see how it was done and if I thought I could do it on my own.
After learning how to line up the planks and how they snap into place, I found this installation process fairly easy. I also discovered, that there are a few planks that didn’t necessarily want to snap in place but with a little wiggling, they were persuaded as well.
Do you need prior experience?
I don’t think that you do. There are several videos online and your flooring may come up with a QR code to scan for an instruction video. I would suggest that you line up your flooring planks just to see how many you may need and how to line them up to make the less cuts. Remember to offset each row so that the seams are the same. They need to be staggard. This may alter the amount you need. (You don’t need to line up or stage all of them just about 1/8 of the area to 1/4 of the area after that the pattern is a repeat. Of course, taking into account cuts in closets, corners, etc.).
Supplies
A hammer or mallet, measuring tape, a small block (softwood, or a less dense material), a box knife, tape, ruler or square, a hand saw, planks, and a vapor barrier. Home supply stores have kits for the smaller items to help snap the planks together if you prefer. I just used what I already had available. The small block of wood and the hammer or mallet are used to persuade some of those hard-to-snap-in planks. Use scissors to open the packages of wood planks, the packaging is thicker than you may think.
Using the box knife I would score some of the planks that needed to be cut and then I use my trim saw to finish cutting. A ruler or a square comes in handy in this part as well. If you have an older home you may find the walls are exactly square and you may need to use more of an angle. Squares make this a bit easier. For beginners, I wish I had just used newspaper roll to make a pattern of the not square walls.
Vapor barrier
A vapor barrier is a necessary layer if you are laying it over a concrete basement floor. Vapor barrier rolls have a few to choose from most are fairly inexpensive. The one I used felt like a thin styrofoam cross with a cellulose-type product (like a sponge meets styrofoam). Putting the seams together for the vapor barrier is done with tape. Some use flooring tape which is just like packing tape with a higher cost so just use packing tape—to cover every little seam area. A friend of mine used rug tape because that is what she had on hand. It has worked fine on her plank flooring as well.
Installing the beautiful wood planks


Putting the planks together in tight areas is a pain. You have to lift the planks to get them to snap in tightly. If you are near a wall, it does become a bit of a challenge to cut on the right side so it will still snap in and keep it looking great with grain pattern. I would say that is about the hardest part. Other than that you could complete a hallway and a room in a weekend. That is with cutting the wood and everything (if there is not a lot of angle cutting). You still have time to celebrate with a dinner and drink after you have finished. That is my kind of project.


Where can you stall?
You could probably install beautiful wood plank flooring anywhere. Perhaps not an area where there is a lot of water, but mine is in a basement that does have moisture in the spring and summer. Not too much moisture where I live so not a big concern. (Although my basement tends to flood more on stopping that in future posts). I installed mine down a hallway and exercise room and used it on my stairs.
I think it turned out great. What do you think?


What would I do differently (cons)?
If I were going to do it again I would use newspaper roll paper (like I mentioned above) and make patterns of the pieces I needed to cut. It would have been easier than marking, checking it going back and re-marking, etc. At times the walls were not straight and the newspaper roll would have made that easier with less waste. That was the only time-consuming part of the whole project.
Pros
It goes down quickly if you are going in a straight line with no cutting. I thought it was amazing to see a floor almost done in a short time frame. It does look beautiful and easy to clean. I believe it was easy for a beginner.
Confidence Builder
Confidence is one of the things that will keep you going and improving on anything in life. It doesn’t mean that you think you are amazing at it, but rather that you have the confidence that you can do it. If it doesn’t go right, you have the confidence to know that you can try again and it will be better the next time. Doing beautiful plank flooring for the beginner is one of those confidence builders that you need to get started on your home improvement journey.
Discover more from Twilight Kaleidoscope
Subscribe to get the latest posts sent to your email.


