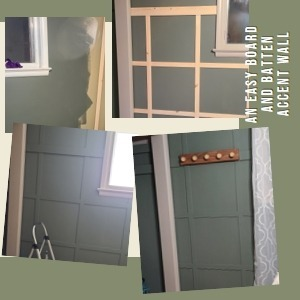
I kept seeing these accent walls that I wanted to try and see how it would look in a room. I wasn’t sure that I could do it easily and cheaply. All I wanted to do was make an easy board and batten accent wall that would add interest to the room.
The bedrooms in my home are small, so I didn’t want them to look smaller. Also, there was the factor of putting up a full 1 x 3 on the walls that would collect dust. I didn’t want that either. They collect dust, there is no way around it. Even my flat walls collect dust, not as much however and just an easy swiping cleans that wall. 1×3 would be an actual small shelf for dust. If that is what was holding you back from doing this, read on.
Deciding on Paint

First, decide on a color and go for it. The paint is matte mid-tone green. I wanted it to be calming and still in line with designer colors. I thought it was going to be a bit bluer than it turned out to look, but I am happy with it.
This picture shows more than you wanted to know. All baseboards were ripped out and everything was cleaned with just a bit of soap and water. The microfiber cloth is still on the window seal. We keep it real here. No mini-mansions or going to a newly built home and staging for this blog. The strips for the easy board and batten wall are in the picture as well. Yes, I said strips.
What do you think of the paint color? I love color but I must tone things down. My daughter states I have too many different colors and she was not wrong. I have completed quite a few painting projects in the house and a bedroom to a closet is coming next.
The color is Behr Conifer green if you want to know. The Behr website is somewhat similar to the true color. When I learn the secret to getting it to look truer to color on their website, I will let everyone. However, on a good note, there are quite a few sample-size paint colors for my hobby projects now.

Conifer Green
The color is much prettier on the walls than in this swatch on the website. It looks like a khaki green and not a pretty one at that. I believe it has more green in it, but I do see on the walls where it has a gray undertone. If I remember the trim color, I will update the post. However, presently I can’t remember. It is a light beige with a gray undertone as well.
Cutting strips for the board and batten wall


I simply cut 1 x 3 common pine into 1/4 strips. Because of the width of the saw blade, I only ended up with 2- 1/4 pieces that were usable on the wall. (It has been surprising that I have used those other small strips for crafting projects and some also like a veneer for window reframing. They do not go to waste). It makes the project very economical.
After the room was fully painted it was time to add the strips to the wall. I chose this design because I liked it. I measured the wall and tried a few different sizes of squares in the design and decided I liked this size of square best. Marked the entire way. Accounting for the 1/4 at the top of the strips in this photo.
The reason for this 1/4 is that I wanted to break up the design somehow and I also thought it would be nice to have a thicker board for hanging items. Then I continued adding strips up to the ceiling.
It was fairly easy to add the strips using a Brad nailer.
Now comes the more time-consuming portion of filling in the brad nailer holes and the edges where the strips came together. Then sanding to make sure everything was smooth.
Ending into the near-completion zone

After the sanding was completed and cleaned up for such. It was time to repaint the wall. You are probably thinking why not put up the strips before painting the wall? I wanted to make sure that I did not have any small gaps between the wall and the wood that would stand out. I did chalk around where the strips met the wall if there was a larger gap. However, I did not have too many large gaps. Therefore, I did not have to chalk all of the boards between the wall and the strips. To me, it was less time-consuming because chalking and standing takes a lot of time.
Then the room was all painted and the board and batten wall were completed as well, started moving things back into the room.

Board and Batten wall completed
Here is that side with the hooks back up and the curtain, which I still need to tea stain but for now I like it. You can see the painter’s tape keeping the trim up so I can nail it in with the Brad nailer.

I also made the trim myself by trimming down another 1/3 common pine filling in any knot holes and sanding it smooth. I added a quarter round to the bottom and a decorative PVC trim piece to the top. It turned out nice.
As you can see, I added warm wood tones for the wall pieces and I did not take pictures of the dresser, night lights, and floral arrangements. There will be more coming on those latter.
Refinishing wood floors

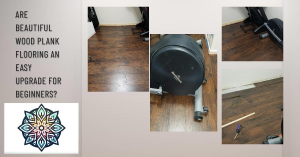
I also decided to refinish the floors as well. As you can see in the first pictures, they needed it.
That is quite a project and I have more wood floors to go in this house. More on refinishing floors to come and make your own wood paste and wood filler.
Now the floors are not an easy project and I wouldn’t recommend doing all of this at the same time. It is stressful. Not to mention I was leaving town for a week and a half and had to get this all done before I left. The paint tape on the floor was where I left off on the last coat of sealant before I had to leave.
I came home and finished it.
The Board and Batten wall part of the room was easy and economical. Everyone who has seen this room loves it. It is warm and inviting. People are surprised that I did it all by myself. I have had several people ask me to help on their easy board and batten wall when they are ready.
Discover more from Twilight Kaleidoscope
Subscribe to get the latest posts sent to your email.


